How a Team Actually Runs on Skillsmith
Six diagrams show what a team is actually signing up for: how a login turns into credentials, how a workspace and its members work, how skills get reviewed into the registry, how a laptop stays in sync, and how the CLI, MCP server, and VS Code extension all touch the same backend.
You just signed your team up for Skillsmith. Here’s exactly what happens next, one picture at a time, showing the system as it actually runs today, not as it’s planned to run someday.
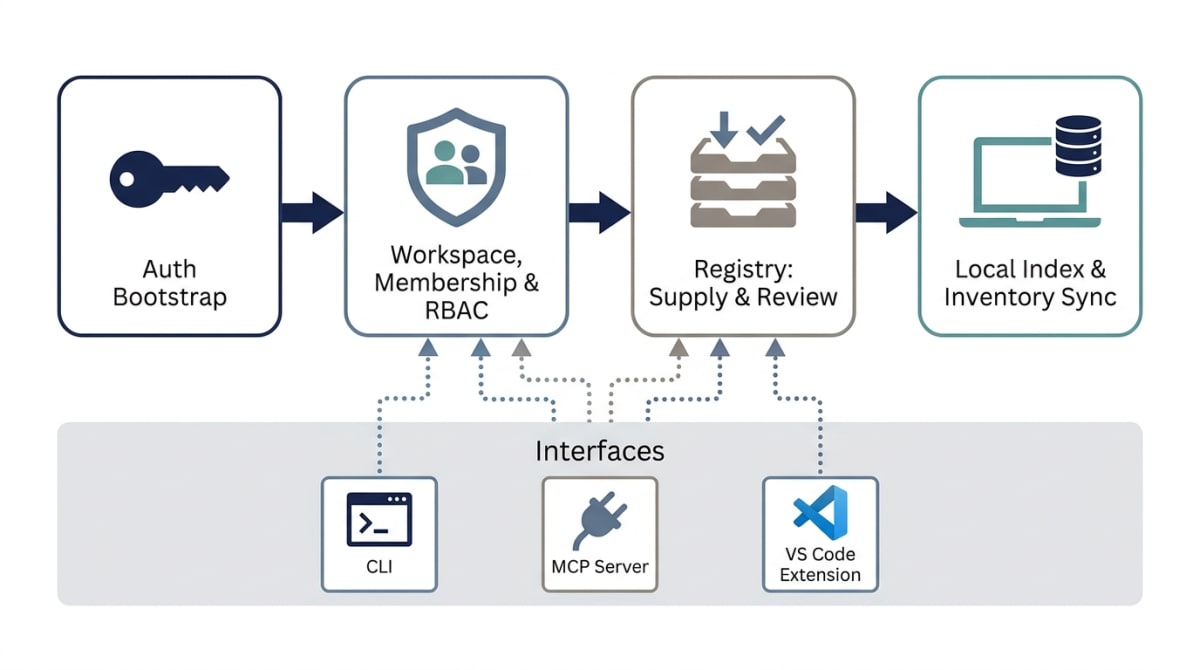
Four stages, in order: a login turns into working credentials, that person lands in a workspace with other people and specific permissions, skills flow into a shared registry through a review step, and a laptop stays in sync with both. Three different doors, the terminal, an AI agent, and an editor, all open onto the same building underneath. The rest of this post walks each stage in order.
Getting in the door
Once your team is on a paid tier, an admin gets a license key. That’s the only thing billing hands you: a key. Everything from there is about turning that key into working credentials on your own machine.
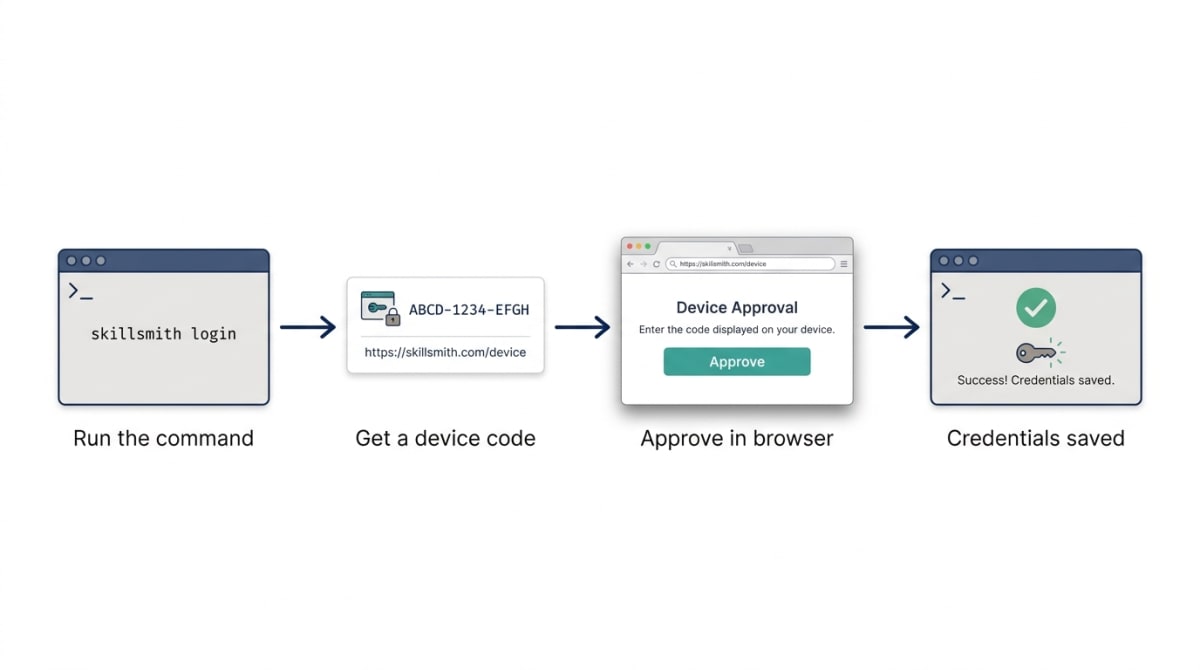
Run skillsmith login and the CLI (short for command line interface, the tool you just typed that command into) doesn’t ask for a password. It shows you a short code, the same idea as the code a smart TV shows you when you sign into a streaming app: you type that code into a browser tab on a device you already trust, approve it there, and the terminal picks up a real access token a few seconds later. Nothing sensitive ever gets typed into the terminal itself. The token lands in ~/.skillsmith/config.json, and from that point on, the CLI reads it automatically every time.
The room everyone shares
A workspace is the office your team works out of. Everyone on the team gets a badge to get in the building; not everyone gets a badge that opens every door.
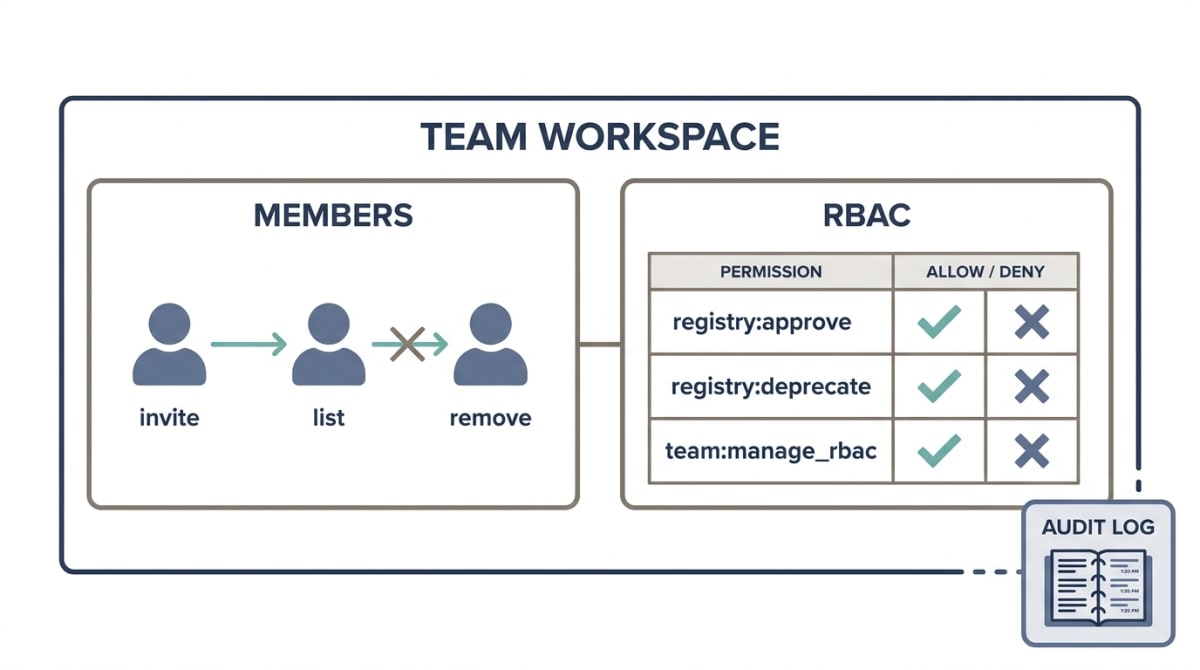
Membership answers “who works here”: invite someone, list who’s already in, remove someone who’s left. That’s tracked separately from what any given person is allowed to do once they’re inside, which is where roles come in. Specific doors exist inside a Skillsmith workspace: approving a submitted skill, deprecating one, managing the roles themselves. Each role gets an explicit yes or no on each door, not a vague “admin can do everything” default. A junior teammate can have a badge that opens the front door and nothing else. An admin’s badge opens the rest.
If your security team is going to ask one question about this layer, it’ll be about the audit log: every one of those door-openings gets written down, exportable for a compliance review later. That’s a sidebar to this diagram, not the point of it, but it’s usually the first thing a reviewer wants to confirm exists before they approve anything else.
Worth being precise about here: a workspace and its membership come with the Team plan. The role-based doors themselves, along with the private registry in the next section and that audit log, are part of the Enterprise plan specifically. A Team-tier workspace still has people in it; it just doesn’t yet have the locked doors.
Where a skill actually comes from
Not every skill your team installs was written in-house. Most weren’t.
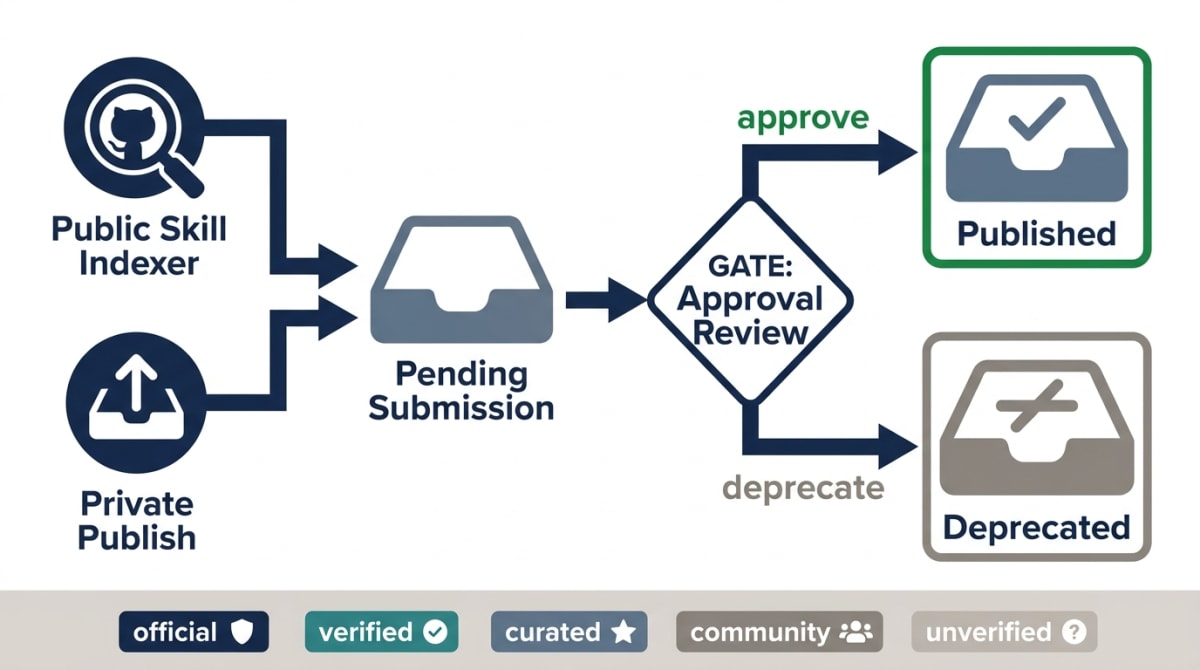
Think of the registry as a loading dock with two delivery doors. One door is the public skill indexer, a crawler that’s already out combing GitHub for skills anyone in the world published openly. The other is your own team’s private publish path, for the runbook your platform engineer wrote that mentions internal service names nobody outside the building should see. Both doors dump their deliveries onto the same pending shelf, and nothing moves from that shelf into the actual registry until someone with the right badge walks over and either approves it or sends it back marked deprecated. That’s the same door-checking layer from the workspace diagram above, doing its job here specifically.
Every skill that does make it through carries a trust tier: official, verified, curated, community, or unverified. Think of it as a shelf label, not a hidden score. It tells whoever’s about to install something exactly how much vetting it’s had, so a policy decision like “block anything below curated” has something concrete to check against.
Two directions, one laptop
A workspace and a registry don’t do anyone any good if what’s actually installed on someone’s laptop drifts out of sync with what the team thinks is installed.
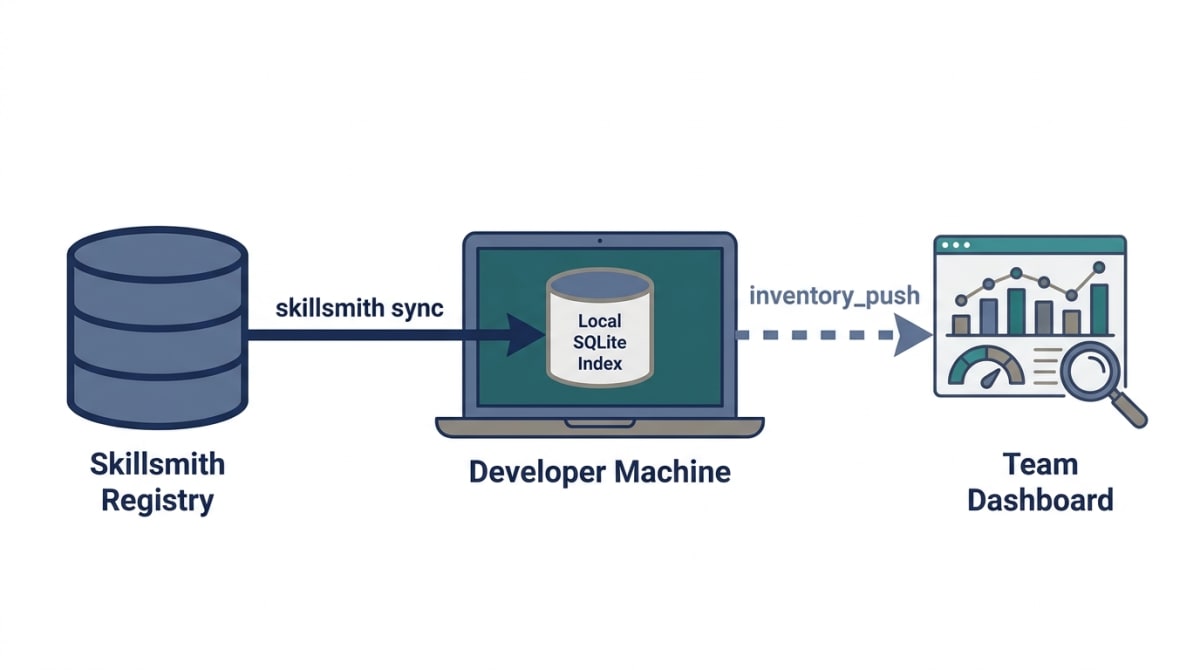
Two flows run here, and they’re easy to mix up because they both touch the same laptop. skillsmith sync pulls the registry down onto that machine, into a small local database so search and install work instantly, without a network round trip every time. That’s the library mailing your local shelf a copy of anything new. Separately, inventory_push runs the other direction: it reports what’s actually sitting on that shelf back up to a team dashboard, so an admin can see, across the whole team, who’s running something outdated or something that’s since been flagged. One flow keeps a laptop current. The other flow tells the team what’s actually installed, laptop by laptop. Neither one substitutes for the other.
Three doors, one building
However someone on your team reaches Skillsmith, whether that’s a terminal window, an AI agent talking over a protocol, or an editor extension, they’re all walking into the same building.
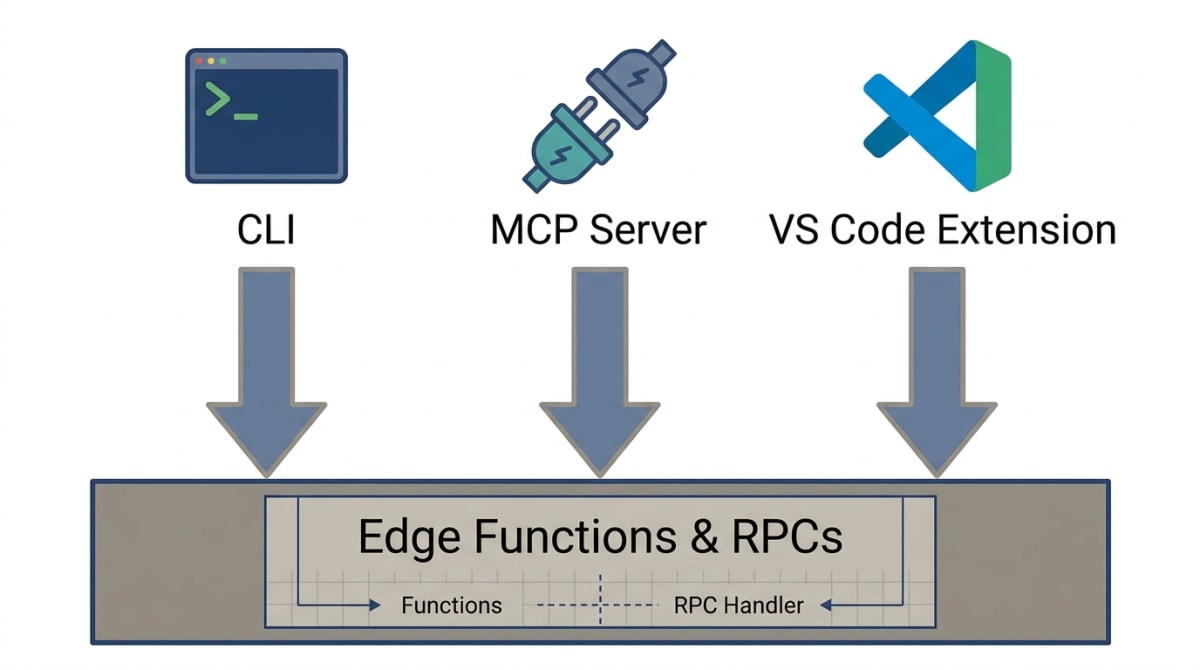
The CLI is the terminal door, for anyone scripting or working by hand. The MCP server (MCP stands for Model Context Protocol, a standard way for an AI tool to call another program) is the door Claude Code and other agent tools walk through, so an agent can search for and install a skill mid-conversation without a human retyping the command. The VS Code extension (VS Code is Microsoft’s popular code editor) is the same capability again, this time inside the editor someone’s already staring at all day. All three hit the identical backend: the same edge functions, and the same RPCs (RPC stands for remote procedure call, a direct function call to the server instead of a full web request). Nothing about permissions, trust tiers, or workspace membership changes depending on which door someone used to walk in.
What to actually check before you say yes
If you’re the one signing off on this for your team, here’s the short version of what to confirm before you call setup done:
- Tier. A workspace itself, with membership, is Team-tier and above. Role-based permissions, private publish, and the audit log are Enterprise-tier specifically, not included at Team. A Community or Individual account can search and install, but doesn’t get a workspace to manage at all.
- Who owns admin. Whoever’s account created the workspace is its owner, and an owner already has every permission, automatically, no setup required. If you want a second person handling day-to-day approvals without owner access to everything, the owner grants them
team:manage_rbacexplicitly. Decide who the owner is before day one, since that role can’t be handed off through the permission system itself. - What a security reviewer will ask for. The audit log (every approve, deprecate, and role change, timestamped) and the trust-tier legend on anything pulled from the public registry. Both exist today and neither needs to be built.
- What “done” looks like. One admin logged in, a handful of teammates invited and given roles, one internally-written skill published and approved into the private registry, and everyone’s laptop reporting into the same dashboard. That’s a team fully set up, not a pilot.
Everything above is running in production today. If you want to see the private registry specifically, start to finish, the private registry walkthrough shows the exact publish-approve-install sequence with real screenshots.